iPhone Guide
This guide explains how to use TextExhibit to convert text message backups into court-ready PDF documents and Excel .xlxs transcripts.
Overview
TextExhibit’s desktop app supports two types of backups:
- iPhone: Full Apple Devices/Finder backup directories, or smaller
.textexhibitfiles created by TextExhibit Extractor (if sent by client) - Android: XML files from the SMS Backup & Restore app
Getting Started
Installation
- Download TextExhibit from the download page
- Run the installer and follow the prompts
- Launch TextExhibit
Loading Backups
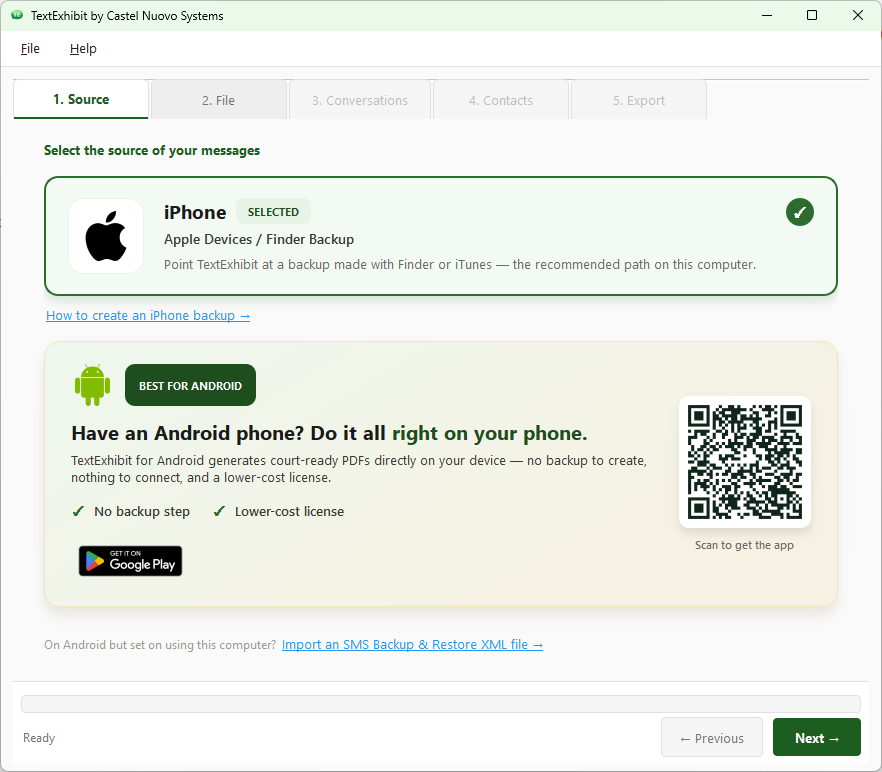
Step 1: Select iPhone as the source
On the Source tab, choose iPhone — Apple Devices / Finder Backup, then click Next.
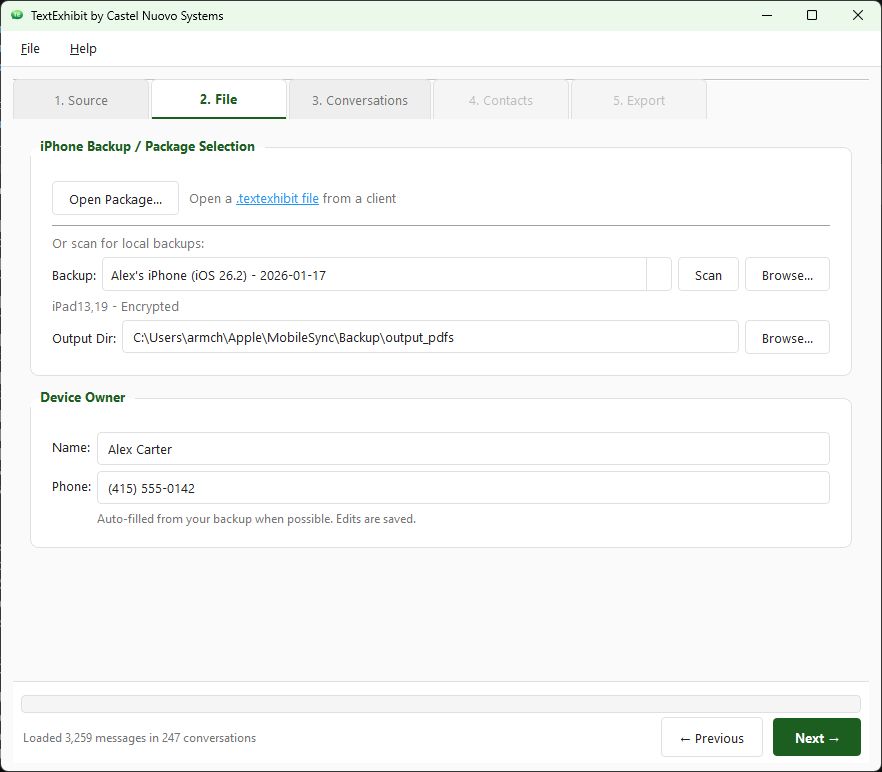
Step 2: Choose the backup file
The File tab offers two ways to load iPhone messages:
- Full iPhone backup: Under Or scan for local backups, click Scan to detect Apple Devices / Finder backups already on this computer, or Browse… to point at a backup folder a client provided. Select the backup from the dropdown (folders have long alphanumeric names). If the backup is encrypted, you’ll be prompted for the password.
- .textexhibit package: Click Open Package… and select the
.textexhibitfile your client created with TextExhibit Extractor. This packages only the conversations the client selected into a single file that’s easy to transfer.
Confirm the Output Dir (where exported PDFs will be written) and verify the Device Owner name and phone number — these auto-fill from the backup when possible, and edits are saved for next time. Click Next when ready.
Encrypted Backups: If using a full iPhone backup that is encrypted, your client must provide the backup password.
From here, the remaining steps (Conversations, Contacts, Export) are the same regardless of source — see the sections below.
New: TextExhibit for Android — We now offer an Android app that allows clients to create PDFs of text message conversations directly on their phone. Clients can then share a .zip of the generated PDFs directly to their attorney, no desktop software needed. Learn more about the Android app.
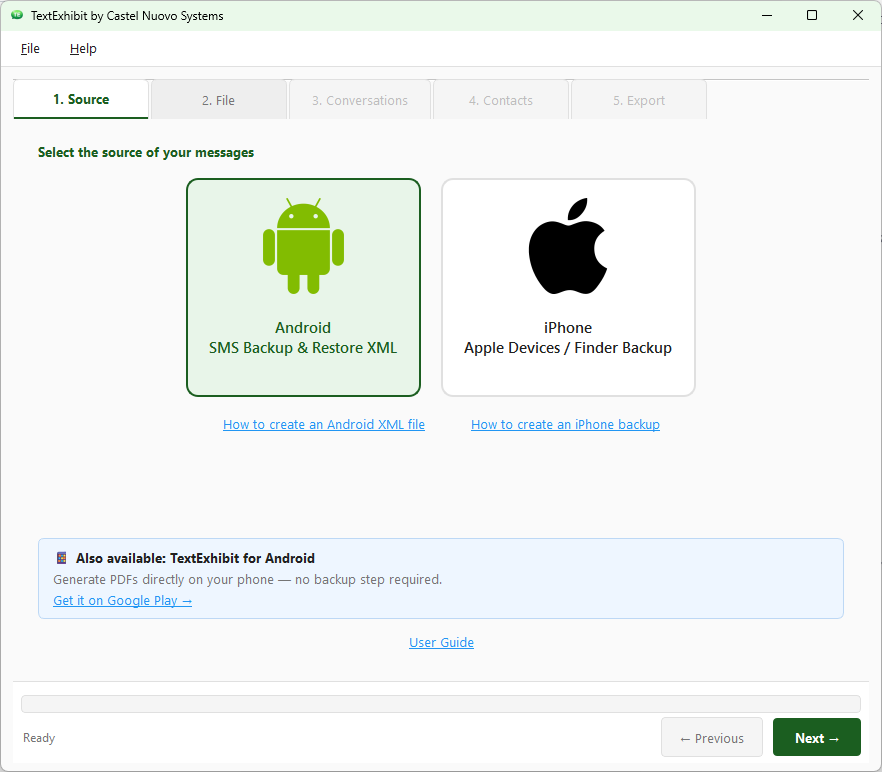
Step 1: Select Android as the source
On the Source tab, choose Android — SMS Backup & Restore XML, then click Next.
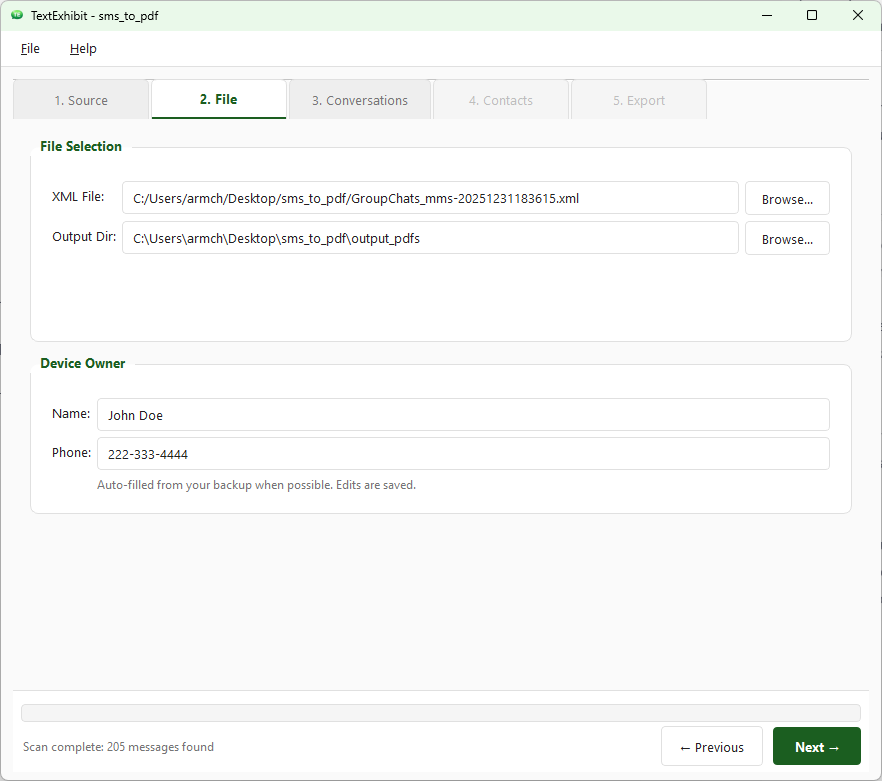
Step 2: Choose the XML file
On the File tab, click Browse… next to XML File and select the SMS Backup & Restore XML your client provided.
- Look for files named
sms-YYYYMMDDHHMMSS.xml— if an MMS backup exists, you may also loadmms-YYYYMMDDHHMMSS.xml. - Want to test first? download Download Example XML
Confirm the Output Dir (where exported PDFs will be written) and verify the Device Owner name and phone number — these auto-fill from the backup when possible, and edits are saved for next time. Click Next when ready.
From here, the remaining steps (Conversations, Contacts, Export) are the same regardless of source — see the sections below.
Select Conversations to Export
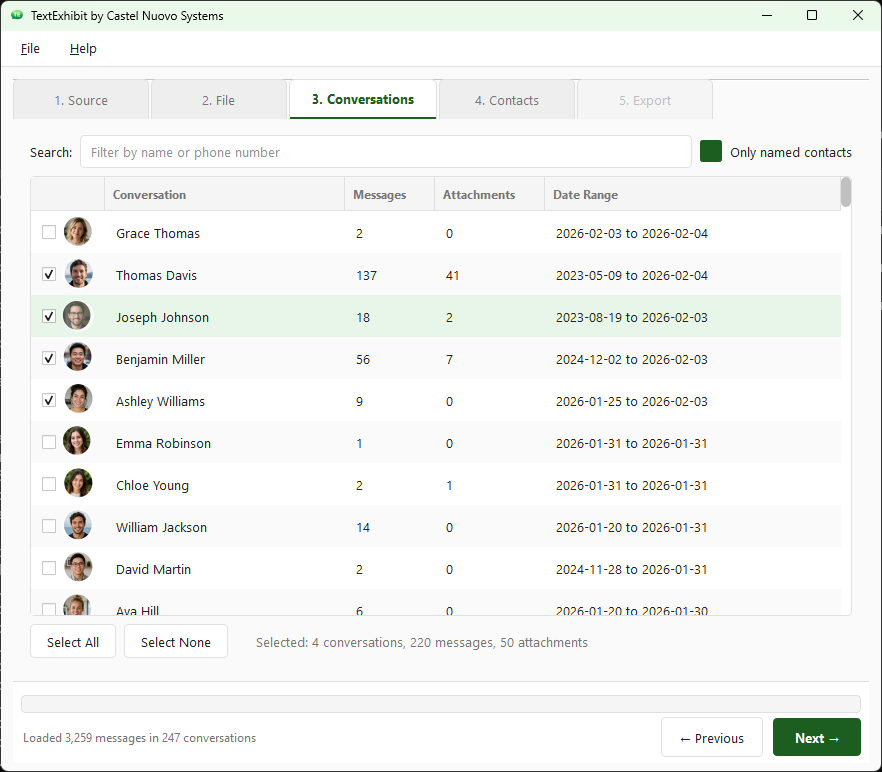
Once a backup is loaded, the Conversations tab lists every conversation in the file along with its message count, attachment count, and date range. Check the box next to each conversation you want to include in the export. The footer summarizes your selection — e.g., Selected: 1 conversations, 137 messages, 41 attachments.
You may enter a name or phone number to Search/Filter for specific conversations to select for export. Conversations you have already selected for export remain selected while searching.
Use Select All or Select None to quickly toggle every conversation, then adjust from there. Click Next when your selection is ready.
Verify Contact Information
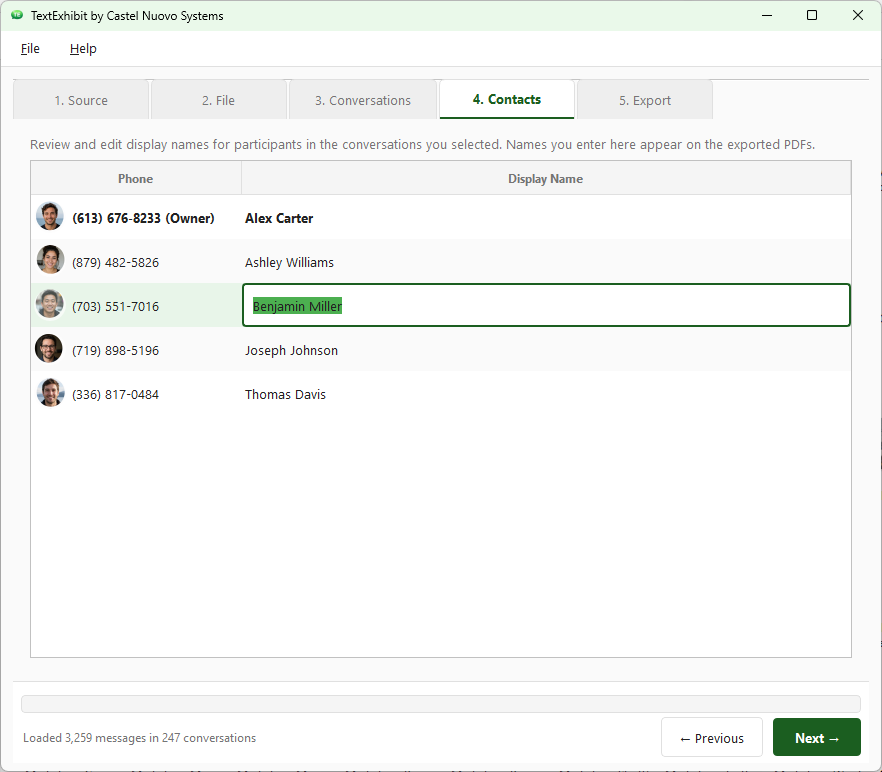
The Contacts tab lists every phone number that appears in the conversations you selected, along with the display name TextExhibit will use for the exported PDFs. Review each row and edit names as needed — most importantly, replace nicknames (e.g., “Mommy”, “Bae”, “Work Guy”) with the full legal names you want shown in the generated PDFs.
The device owner is marked with (Owner) and is pre-filled from the Device Owner fields you confirmed on the File tab. Edits made here are saved alongside the backup and persist between sessions, so you only need to clean up names once per client.
Contacts are stored locally in a contacts.json file next to each client’s backup. Each backup source maintains its own contact mappings.
Export Options
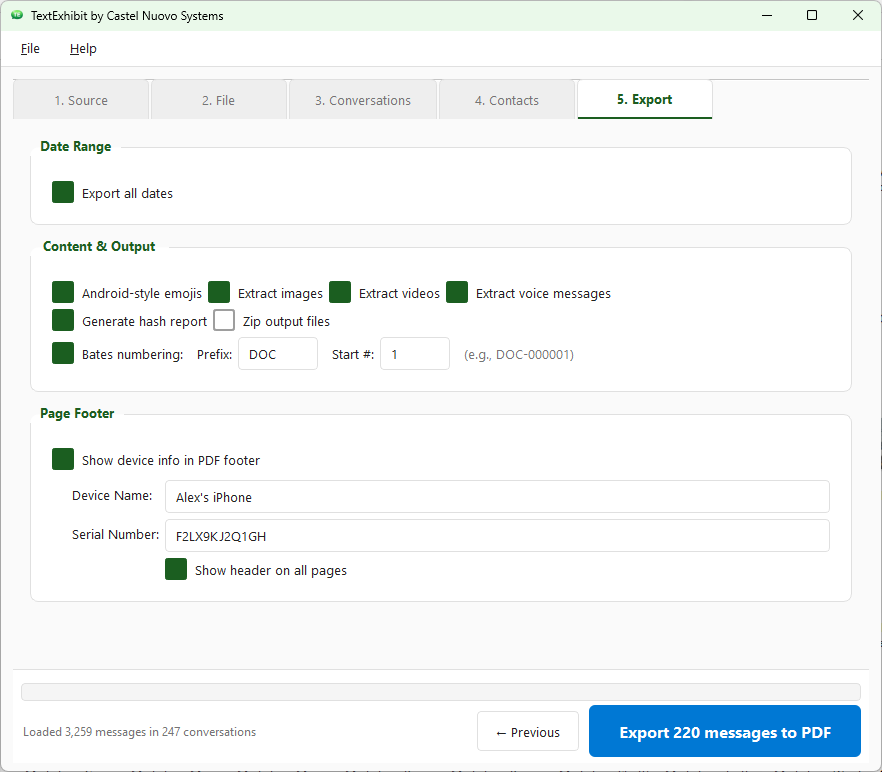
The Export tab is where you configure the final PDF and/or Excel output. The export button at the bottom of this screen automatically recalculates how many messages will be exported as you change the options (e.g., Export 137 messages to PDF), so you can confirm your selection before generating anything.
Filter by Date Range
Limit the export to a specific time period relevant to your case:
- Uncheck “Export all dates”
- Set the Start and End dates using the calendar pickers
- The export button updates to reflect how many messages fall within the range
Content & Output
- Apple/Android-style emojis — Render emojis using Apple’s/Android’s emojis for visual consistency with how messages appeared on the sender’s device.
- Extract images / videos / voice messages — Save attachments as separate files alongside the PDFs. Referenced from the PDF with relative paths.
- Generate hash report — Produce a verification report with SHA256 and MD5 hashes of the source file and each output PDF, a processing timestamp, and Bates number ranges. Useful for chain-of-custody documentation.
- Zip output files — Package the entire output folder into a single
.zipfor easy transfer. - Bates numbering — Add sequential identifiers (e.g.,
DOC-000001,DOC-000002) to each page. Set a Prefix and a Start # to pick up where a prior exhibit left off.
Page Footer
Enable Show device info in PDF footer to print the Device Name and Serial Number on each page, which courts often require for authentication. Both fields auto-fill from the backup when possible. Enable Show header on all pages to repeat the conversation header at the top of every page.
Android serial numbers: Android apps cannot read the device serial number, so this field won’t auto-fill for Android backups. Ask your client to provide their device name and serial number from Settings > About Phone.
Output Organization
TextExhibit organizes output for easy navigation:
For Large Conversations
Conversations with 100+ messages are automatically split into monthly PDFs:
Messages_2024_01_January.pdfMessages_2024_02_February.pdf- etc.
For Smaller Conversations
Conversations with fewer messages are combined into a single PDF with the date range in the filename.
Output Folder Structure
  TextExhibit_Output/
├── [Contact Name or Phone Number]/
│   ├── Messages_2024_01_January.pdf
│   ├── Messages_2024_02_February.pdf
│   ├── media/
│   │   ├── image_001.jpg
│   │   ├── video_002.mp4
│   │   └── ...
│   └── ...
├── Verification_Report.pdf
└── ...
PDF Styling
TextExhibit generates platform-appropriate styling:
Android Messages
- Light blue bubbles for sent messages
- Gray bubbles for received messages
- Roboto font with Noto Color Emoji
iPhone Messages
- Blue bubbles for iMessage (sent)
- Green bubbles for SMS (sent)
- Light gray bubbles for received messages
- iOS-style bubble shapes with pointers
Generating PDFs
- Configure your export options
- Click “Generate PDFs”
- Monitor the progress indicator
- When complete, click “Open Folder” to view the output
Tips for Legal Use
Chain of Custody
Always generate a Verification Report to document:
- Source file integrity (hash values)
- Processing timestamp
- Output file integrity
Client Confidentiality
TextExhibit processes all data locally on your computer. No data is transmitted to any server. See our Privacy Policy for details.
Large Cases
For cases with many conversations or long time periods, consider:
- Processing each client’s backup separately
- Using date filters to focus on relevant periods
- Organizing output folders by client or matter number
Troubleshooting
“No messages found”
- Verify the correct file type is selected (Android XML vs iPhone backup)
- Check that the backup file is not corrupted
- For iPhone, ensure you selected the correct backup folder
Slow performance with large backups
- Close other applications to free up memory
- Consider filtering by date range to reduce the number of messages
Missing images or media
- Ensure “Extract Media” is enabled
- Check that the source backup includes MMS/media data
Next Steps
- Purchase a License to remove trial watermarks
- Contact Support if you need assistance
- View FAQ for common questions